Sew a portable changing pad with dipes & wipes storage built right in!
My little sister is a Mommy! She has been for about three months now. I've already sewn some adorable itty bitty things, but this month is her birthday and I wanted to sew something just for the new mom. Or at least, something for her new title. That she can also share with the new dad. Let's just say I got an idea in my head about three months ago and this birthday month gave me a good reason to actually sew it. You can, too!
This blog has been compensated by Collective Bias, Inc. and its advertiser. All opinions are mine alone. #SkinCareForBaby #CollectiveBias
I've been sharing a lot of things with my sister lately: sleep advice, mom blogs to read, favorite soft books from The Peanut's babyhood (it seems so long ago, *sob*), and favorite brands of everything from paci's to diapers. Like Huggies® Little Snugglers Jumbo Pack -- gotta love the Jumbo Pack! -- which I preferred back in the diaper days because they magically kept the poop from going up the back (true story) and had that fun little wetness indicator so I didn't have to stick my finger in to feel, thankyouverymuch. More importantly, in concert with Huggies® Natural Care Wipes (64 sheets), The Peanut's perfect and very delicate porcelain skin was never irritated. Wipes soft enough for the fine skin, strong enough for the big messes with Triple Clean layers, what more can you ask for?
I headed out to my local Walmart for the preferred Huggies wipes and dipes to stuff into my new project. I found them easily in the Baby section, nestled between the impossibly small clothes and darling toys that make my own ovaries ache.
Then I skipped further back in the store to my favorite section (fabric, natch) and eased the ache with a little retail therapy in the form of perfect fabrics and notions for an On-the-Go Diaper Caddy & Changing Pad. Would you like to sew one, too? I've got a tutorial for you!
If you’re like me and prefer to print out the tutorials you use, download the 4-page PDF version here for just $1.99! Otherwise, read on for step-by-step directions how to sew a portable changing pad with built-in diaper & wipes storage.
MATERIALS
- Indoor/Outdoor Fabric for Outer Shell, ½ yard (1 yard if directional fabric)
- Coordinating Laminated Fabric for Lining,* ½ yard (1 yard if directional fabric)
- Pellon Nature’s Touch White Cotton Batting with Scrim or equivalent, ½ yard
- Utility Mesh Fabric, 8″ x 10″ scrap
- Optional: Third Coordinating Fabric, laminating optional (for the pocket), two 8″ x 10″ scraps
- Half-Inch Double Fold Bias Tape (approx. 88″)
- Coordinating Fold-Over-Elastic, 12″
- Coordinating Braided or Decorative Half-Inch or Wider Elastic, 13″
- Coordinating threads and heavy duty needle
- Portable, Refillable Wipes Case
CUTTING
The dimensions listed here will create a final Changing Pad & Diaper Caddy 12 ½″ wide x 31 ½″ tall. You can easily change these dimensions to fit your needs.Indoor/Outdoor Fabric
Outer Shell: 13″ x 32″; cut 1
Handle: 4″ x 12 ½″; cut 1
Laminated Lining Fabric
Lining: 13″ x 32″; cut 1
Wipes Pocket:* 8″ x 10″; cut 2 (same or coordinating fabric)
*Note: The example here uses laminated fabric on the exterior panel of the pocket and plain, un-laminated quilting cotton on the interior panel. Two laminated pieces may be too thick for the elastic-gathered top.
Batting
Batting: 13″ x 32″; cut 1
Utility Mesh Fabric
Diaper Pocket: 8″ x 10″; cut 1
CONSTRUCTION
PREPARE HANDLE & POCKETS
1. Prepare the Handle by folding it in half, wrong sides together, along the length and press. Open it up and press each outside edge to the center line. Fold the fabric in half again and press. The final Handle will be 1″ wide by 12 ½″ long with the raw edges enclosed in the fold. Edge-stitch down each long edge. Set aside.
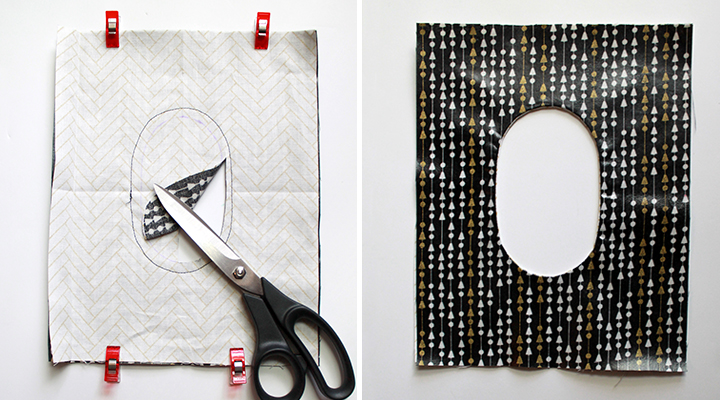
2. Trace the opening of the Wipes Case onto a scrap of paper. Correct the shape to a symmetric oval, straight on both sides; cut the oval out of the paper to create a template. Center the oval template on the wrong side of one of the Wipes Pocket pieces and trace.
 |
| Step 2 |
3. With both Wipes Pocket pieces right sides together, stitch ¼″ outside of the oval you traced. Cut out the center of the oval, clip the curves, and turn the two pocket pieces wrong sides together. Press – be sure to use a press cloth on laminated fabrics!
 |
| Step 3 |
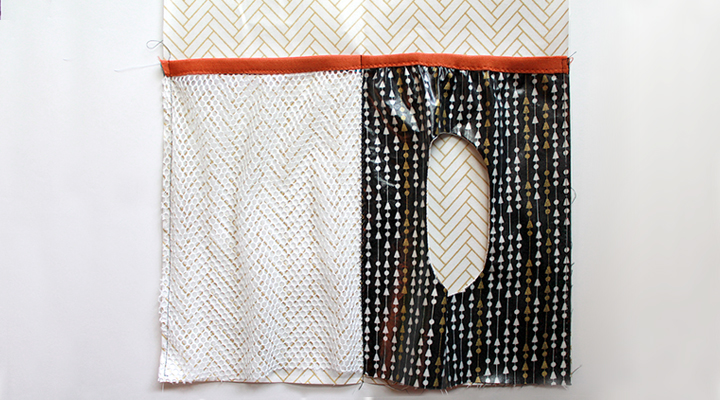
4. Working along the left-side edge of your newly formed Wipes Pocket, separate the top and bottom layers of fabric. Pin the utility mesh to just the top layer. Beginning on the opposite side, roll all the fabrics, pocket and mesh, toward the pinned layer; then bring the bottom layer of the Wipes Pocket over top of the roll and align the same left edge, right sides together, on top of the pinned mesh and top layer; pin it in place to create a fabric “burrito.” (For more in-depth, step-by-step fabric-burrito instructions, refer to the Burrito Cuff Pajama Tutorial.)
5. Using a ¼″-inch seam-allowance, sew along the pinned edge with a short stitch to ensure the stitches properly catch the utility mesh; be careful to only stitch through the top fabric, utility mesh, and bottom fabric pinned together in Step 4, and avoid the burrito fabric innards rolled in the middle. Turn the burrito right sides out by pulling the utility mesh (but don’t tear it!). Press – again, use that press cloth on the laminate!
 |
| Steps 4 & 5 |
6. Find and mark the center of the Fold-Over-Elastic (FOE). Align the FOE wrong sides together on the new Double Pocket, placing the center of the FOE on the seam line of the two fabrics and the top edge of the Double Pocket at the fold line of the FOE. Stretch the FOE to the full width of the Double Pocket, and sew in place with a zig-zag stitch. Fold the FOE over the edge and top-stitch with a zig-zag on the right side.
7. Working on the Lining fabric, align the top of the Double Pocket 10 ¼″ up from the bottom edge. Sew down the center of the Double Pocket where the two fabrics meet using a narrow zig-zag stitch. Baste each outside edge of the Double Pocket to the Lining with a scant ¼″ seam allowance.
 |
| Steps 6 & 7 |
8. Working at the bottom edge of the Wipes side of the Double Pocket, mark ½″ from center seam, then ¾″ beyond the first mark. Bring the second mark over on top of the first mark creating a pleat and pin it in place. Repeat from the outer edge of the wipes pocket.
9. Repeat Step 8 on the utility mesh Diaper pocket. Baste across the entire double pocket catching the pleats as you stitch.
 |
| Steps 8 & 9 |
CONSTRUCT THE CHANGING PAD
10. Working on the right side of the Shell fabric, mark the full width 10 ¼″ up from short edge. Mark second line 1″ up from the first line, and then a third line 10″ up from the second line.
11. With wrong sides together and right sides out, create a sandwich of the Lining, Batting, and Shell fabrics. Matching the bobbin and top thread to the Shell and Lining fabrics, top-stitch across each of the three lines marked in Step 10.
12. Trim the entire Changing Pad to 12 ½″ x 31 ½″. Using a glass or mug (here, a 16 oz. Solo cup), mark and trim all four corners so they are evenly rounded.
 |
| Steps 10 & 12 |
13. Working Lining side up, align the top edge of the Half-Inch Elastic 7 ½″ up from the bottom edge (2 ½″ down from the nearest top-stitch line). Match the edges of the elastic with the edges of the Changing Pad and pin it in place (decorative side down, if not reversible). Note the elastic will not lay flat as it is longer than the width of the Changing Pad; the extra length will be stitched into the bias binding before it is flipped to the front. Baste the edges in place with a scant ¼″ seam allowance.
 |
| Step 13 |
14. Working Shell side up, center the Handle over the single top-stitch line. Baste the edges in place with a scant ¼″ seam allowance.
 |
| Step 14 |
15. Finish the outer edge of the Changing Pad and Double Pocket by sewing bias tape around the entire perimeter using your preferred method. And for one last time: remember to use a press cloth over any laminated areas if you like to press the bias tape in place as you go; it would be shame to ruin your project or iron so close to the end.
 |
| Steps 15 & 16 |
16. Flip the Half-Inch Elastic from the Lining Side to the Shell side and fill your pockets with dipes & wipes! Fold the Double Pocket up onto the Lining, then fold down the top third of the Changing Pad and tuck it into the elastic.
 |
| Done! |
YOU'RE DONE!
Thanks to the Indoor/Outdoor fabric this portable Changing Pad & Diaper Caddy can take a lot of abuse and hold up well. The laminated lining and indoor/outdoor fabric shell make the Changing Pad easy keep clean with disinfectant wipes. And the elastic-topped pockets easily hold your supplies in place until you need them.
This is a great back-up case to leave in a car or at grandma’s house. You can also throw it in a large tote or into the under-basket of your stroller. The On-the-Go Changing Pad & Diaper Caddy also makes a great present for parents of a brand new little one!
If you use this tutorial, I’d love to see and hear about your results. Come share your projects on The Inspired Wren “Share” page. There you can link up your original images from a blog, Flickr, Pinterest, or Instagram.
PS -- Thanks for reading to the end. Pair your new Diaper Caddy with a Pocket Tissue Pack Cover and a Hand Sanitizer Jacket sewn in matching fabrics for a fabulously coordinated set. ~Ren
Ren Murphy writes for The Inspired Wren.
___________________________________________________
You should really see all that goes into each project!
From my marathon sewing sessions, to all that I do when I #shouldhavebeensewing catch daily updates on Instagram (and Flickr) of works-in-progress. Get that behind the scenes view you’re looking for, and sneak peeks of upcoming tutorials, too.
___________________________________________________
The Inspired Wren is a participant in the Amazon Services LLC Associates Program, an affiliate advertising program designed to provide a means for sites to earn advertising fees by advertising and linking to amazon.com.


