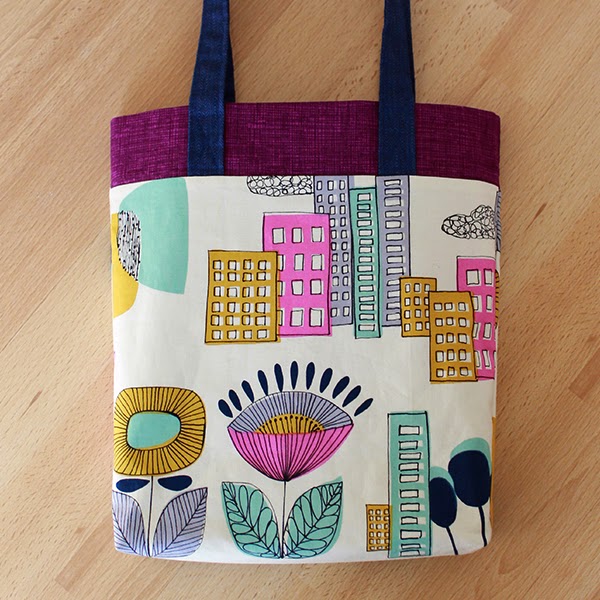
Three fabrics, ten steps, one lined tote bag tutorial, zero bottom seam; the perfect showcase for your favorite fabrics!
CHRISTMAS! I love Christmas! And I have to work hard to keep myself in check and not over-extend myself baking and making all the gifts for all the people! (Surely, I'm not alone in this.) But as the year draws to a close, and the January anniversary of this blog approaches, I want to make sure I have just the right gift ...for you. How would like another December tutorial? Humbug! That's not enough. How about the actual tote from the tutorial? Read on for an opportunity to get your hands on both, and more!
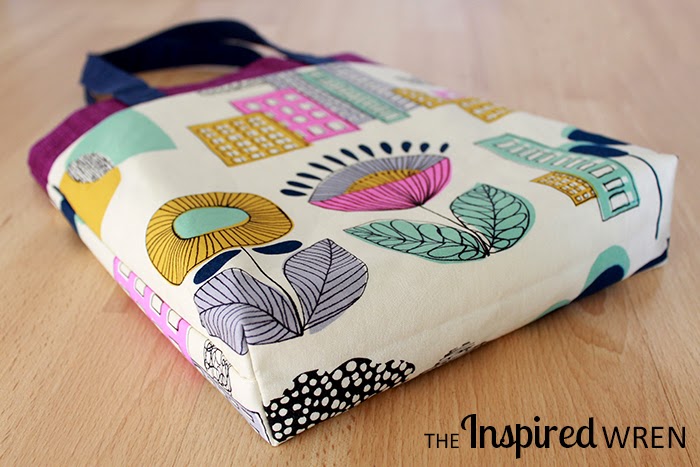
Let's start with the tutorial [originally published on Sew McCool in November 2014]. This tote is the perfect project to highlight great fabric combinations. What better (free) gift to yourself is there then to actually use your favorite fabrics? The unique construction of this lined bag features reinforced handles and no bottom seam, so you know it will hold up well to daily use.
If you're like me and prefer to print out the tutorials you use, you can download the three-page PDF file here for just $1.99! Otherwise read on for step-by-step directions how to sew a 3-Fabric, 10-Step Tote of your own -- it’s time to stop petting those fabrics in your stash and show them off!
 |
| Download the pattern now! |
MATERIALS
- Three coordinating quilting-weight cottons for the outer Shell, the inner Lining, and the Handles*
- Medium-weight iron-on stabilizer
- Coordinating thread
*See Cutting for the amount of materials needed. Keep in mind that you could cut this project across the grain (depending on the print) with satisfactory results and therefore not need as large a cut of fabric. Also note the Shell is folded in half with no bottom seam, so beware a one-way directional print as it will appear upside down on one side of the tote. In this example I made sure the flowers were oriented correctly and decided the remainder of the print was abstract enough not to be distracting upside down. Use your best judgment when choosing and placing the fabric.
CUTTING
The dimensions listed here will create a final Tote Bag 9 ½" wide x 12" tall x 2" deep. You can easily change these dimensions to fit your need; keep in mind that the seam-allowance varies in places.
Shell: 13" x 22½", cut 1 fabric; cut 1 interfacing
Lining: 13" x 30½", cut 1 fabric; cut 1 interfacing
Handles: 4" x 22", cut 2
CONSTRUCTION
1. Prepare each Handle by folding it in half, wrong sides together and press. Open it up and press each outside edge to the center line. Fold fabric in half again and press. The final width of the Handle will be approximately 1" with the raw edges enclosed in the fold. Edge-stitch down each side. Set aside.
2. Apply the interfacing to the Shell and Lining fabrics following the manufacturer’s instructions.
3. Working with the right side up and matching the raw edges, center the ends of one Handle 4" apart on a short end of the Shell fabric; pin in place. Repeat with the second Handle on the opposite short end of the Shell.
4. With right sides together, align the short ends of the Lining and the Shell sandwiching the Handles in between—note the Lining will not lay flat as it is longer than the Shell. Pin in place.
5. Stitch each short end with a ¼" seam allowance, catching the Handles in the seams.
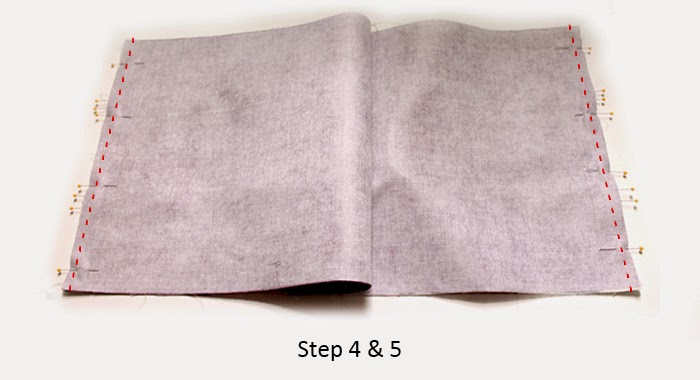 |
| The red dotted lines indicate the stitch location for Step 5. |
6. Turn the Tote right side out and press the seam allowance toward the Shell. Press the entire Tote flat so that the Lining fabric is an even 2" at each end. Pin on either side of the Handles to maintain the 2" borders.
7. Stitch each Handle onto the Lining fabric (through both layers) with an approximately 1¾"-tall X.
8. Sew the side seams of the Tote with a French-seam finish:*
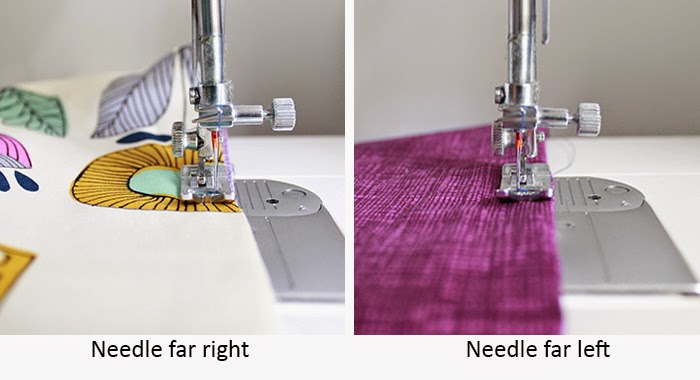
a. Fold the Tote in half right side out—with the Lining in and the Shell facing out—and stitch down both sides with a shy ¼" (or a 1/8") seam allowance. QUICK TIP: Sew with the fabric in the ¼" position but move the needle to the far RIGHT position for these seams. Trim any loose or frayed threads.
b. Turn the Tote wrong side out and press the side seams flat. Stitch down both sides with a generous ¼" (or a 3/8") seam allowance encasing the raw edges of the seam. QUICK TIP: Sew with the fabric in the ¼" position but move the needle to the far LEFT position for these seams.
*If you prefer to finish the two side seams with an alternate method, know there is a ½" seam-allowance on each side.
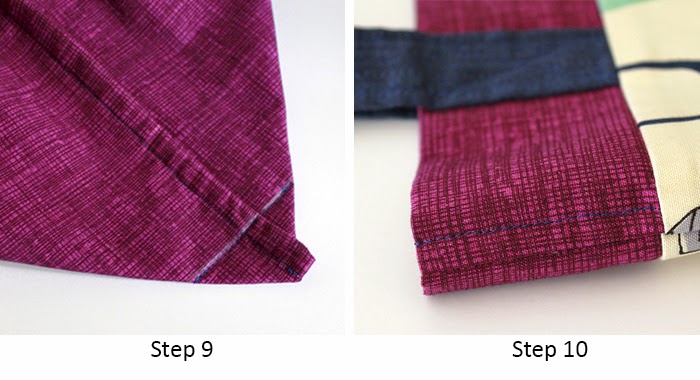
9. Pinch one bottom corner together so that the side seam is centered on the triangle created; fold the seam allowance to one side. Mark up 1" from the corner point and draw a 2"-wide line perpendicular to the seams. Stitch on the line. Do NOT trim; if you prefer you can hand-tack the point of the corner to the side seam, but it is not necessary. Repeat on the second Tote corner.
10. For a finished touch, top-stitch on the top at each of the side seams' lining-bound border catching the seam allowance beneath.
YOU'RE DONE!
So which of your fabrics will you use to sew a tote for yourself? For the shell of this tote I used my long-saved “mercer” by the De Leon Design Group for Alexander Henry Fabrics (2012 Collection). Of course the tote would also make a great gift in any fabric. Pair it with a Pocket Tissue Pack Cover and a Hand Sanitizer Jacket for a lovely, coordinated gift set this Holiday season.
If you sew a 3-Fabric, 10-Step Tote for yourself or as a gift I'd love to see it. Be sure to use #TIW310tote and #theinspiredwren, and tag @theinspiredwren on social media!
...but if you're feeling pressed for time this holiday season and sewing a full set is overwhelming, you could just enter to win this set.
...but if you're feeling pressed for time this holiday season and sewing a full set is overwhelming, you could just enter to win this set.
I can't thank you enough for visiting and reading each week. This "little blog project" has grown beyond my expectations and that's thanks to you. So comment below and enter to win the 3-10 Tote along with the Tissue Pack Cover and the Hand Sanitizer Jacket. Unfortunately I can only ship within the United States. So, if you're in the USA this full set could be yours with one little comment: tell us your favorite handmade gift to give (or receive) for your chance to win! Then be sure to come back to the Rafflecopter to register your entry.
Edited to add: Sorry, the contest has ended. Congratulations to winner Cindy D!
PS -- Thanks for reading to the end. If you're looking for other bags to tote around, try quick-sew Shortcut Quilted Tote, the classic Lined Canvas Tote, or any of these great bag tutorials! ~Ren
Ren Murphy writes for The Inspired Wren.
Snowflake image created by Danielle Garbouchain from the Noun Project.
___________________________________________________
You should really see all that goes into each project!
From my marathon sewing sessions, to all that I do when I #shouldhavebeensewing, catch daily updates on Instagram (and Flickr) of works-in-progress. Get that behind the scenes view you’re looking for, and sneak peeks of First Tuesday Tutorials, too.
___________________________________________________
The Inspired Wren is a participant in the Amazon Services LLC Associates Program, an affiliate advertising program designed to provide a means for sites to earn advertising fees by advertising and linking to amazon.com.


