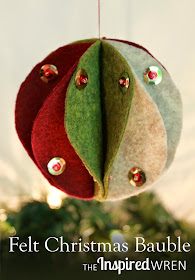
At the end of June a Facebook post reminded me that there was already less than six months until Christmas. Soon after, Deby at Sew So Easy reminded me via email that I agreed to join in the Fab Felt Christmas Tree Ornaments blog hop. I wasn't ready to clear my sewing table of summer to make room for winter holidays, so I took to my couch.* This seemingly simple felt ball took three mock-ups(!) before I was able to translate the classic paper sphere ornament into felt with a tiny bit of bling. I'll save you the stress of trying to figure it out for yourself with this quick step by step tutorial illustrating how to create your own handmade Felt Christmas Bauble. Bonus: you can recreate this ornament with thread or with hot glue!
*It's the third Tuesday of the month by the way, and you'll be forgiven for not knowing that means this is the correct day to share a Couch Craft. After all, even though I've published my editorial calendar for all to see, I don't think I've kept to it very well. Surprisingly, no one has called me out on that yet.
If you're like me and prefer to print out the tutorials you use, you can download the four-page PDF file here for just $1.99! Otherwise read on for a full tutorial how to create this classic Christmas bauble with felt.
MATERIALS
- Felt, 3 different colors of the same weight
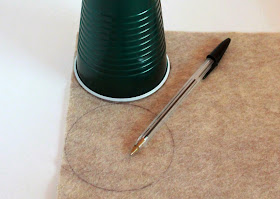
- Something round to trace; for this version I used a classic 18 oz. Solo cup
- Sequins, size and color of your preference; pictured here I used one large gold sequin and one small red sequin at each position
- Seed Beads; necessary for needle & thread version, optional for hot glue version
- Needle and Coordinating Thread* OR Hot Glue Gun and Floral Wire
*If opting for needle & thread, be sure your needle will thread through the sequins and especially the seed beads.
CUTTING
Trace the circle of your choice and carefully cut two circles from each color of felt, for a total of six circles. Keep in mind that the raw edges remain exposed so you'll want smooth curves on each circle.
Trace and cut one more circle of the same size from a piece of scrap paper.
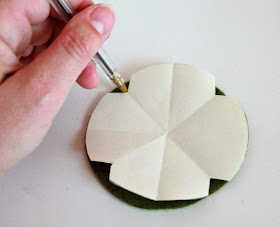
1. Make a template with your scrap paper circle. Fold the piece of scrap paper in half and then in half again and then in half one more time. Snip off one corner. Unfold the template to reveal four equidistant notches on the circle. (Did you get that? Don't panic, that might be the hardest step and if I've confused you, you can probably skip it. I was just being particular about making sure all the sequins were aligned perfectly. You don't need to be so fussy if you don't want to be. And if you want to skip Steps 1 & 2 you can.)
2. Mark the connection points on your felt circles. Take one felt circle and fold it in half; crease the fold. Using your newly made template, align the center fold of the paper and the felt, then mark four dots at each notch point. Feel free to use a pen or a marker to make the marks, it will be covered by sequins in the end. Flip the felt circle over and mark all four positions again. Repeat on all the felt circles.
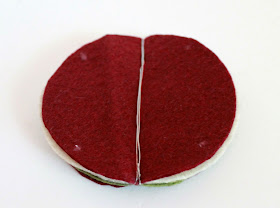
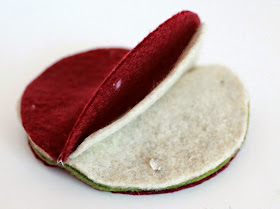
3. Stack your felt circles, being careful to align the center folds, using this pattern: A B B C C A; pictured here as Red Green Green Cream Cream Red.
Trace and cut one more circle of the same size from a piece of scrap paper.
CONSTRUCTION
2. Mark the connection points on your felt circles. Take one felt circle and fold it in half; crease the fold. Using your newly made template, align the center fold of the paper and the felt, then mark four dots at each notch point. Feel free to use a pen or a marker to make the marks, it will be covered by sequins in the end. Flip the felt circle over and mark all four positions again. Repeat on all the felt circles.
3. Stack your felt circles, being careful to align the center folds, using this pattern: A B B C C A; pictured here as Red Green Green Cream Cream Red.
NEEDLE & THREAD METHOD
After Cutting, complete Steps 1-3 under Construction before continuing to Step A1.
A1. Stitch through the complete stack along the center fold, leaving a loop of thread at the top for hanging the finished ornament. The stitching will be visible along the outer circles of the stack so choose a thread to blend with color A, in this example that would be red. (I found I needed a longer, heavier needle for this step.)
A2. With your needled threaded (the one that will fit through the seed bead), knot your thread into the felt at the top right mark of the first layer of felt.
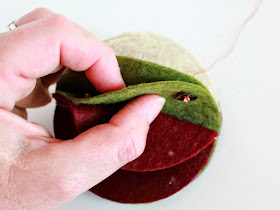
A3. Thread one large sequin, one small sequin, then one seed bead onto the needle and push the sequins down to the felt. Now thread back through the two sequins (but not back through the seed bead, it will create an anchor/knot to hold the sequins in place), then through the first layer of felt.
A4. Thread the needle into the second layer of felt at the matching mark, and pull through.
A5. Thread one large sequin, one small sequin, then one seed bead onto the needle and push the sequins down to the felt. Now thread back through the two sequins, then back through both layers of felt to come out underneath the first set of sequins threaded. Tie off so that the two layers of felt are stitched together tightly and so that the knot remains hidden under the sequins.
A6. Repeat Steps A2 - A5 beginning at the bottom mark of the second layer of felt. Then proceed to the top mark of layer three, then the bottom mark of layer 4, and so on (12 times total) until the entire ornament is complete.
After Cutting, complete Steps 1-3 under Construction before continuing to Step B1
B1. Wrap floral wire around center of stack, tight enough that the circles can't wiggle too much while you work with them, but not so tight that they begin to bend/curve.
B3. Hot glue the second and third layers of felt together at the next available/bottom mark. Then proceed to glue layers 3 and 4 together at the top, then layers 4 and 5 at the bottom, and so on around; 12 times total. (Optional: You could stop here, it's pretty as it is. Or you could keep going and add some bling.)
B4. Glue sequins on remaining visible marks as you desire. I quickly realized a pair of tweezers was very helpful for placing each sequin and bead. Pictured here, I stacked one large sequin, one small sequin, and one seed bead at each mark. I'll admit these stacks were tedious. Next time I'll get shaped sequins or simple rhinestones and just put one at each position.
B5. Thread string through the top of the wire creating a hanging loop for your bauble.
YOU'RE DONE!
I know what you're going to ask so let me say now, I found both methods equally fast and honestly don't prefer one over the other. While sitting on the couch next to Mr. Wren watching TV, the needle and thread method was quiet and relaxing; I sat back with my feet up and my sequins in a bowl on my lap, though there was a lot of thread knotting. While sitting at my desk while The Peanut played, I found the hot glue method worked great too, though there were a lot of those stringy hot-glue threads.
Pick your comfort zone - thread or glue - and go for it! Either way it's faster than it looks. In the end you'll have an elegant ornament (or bright, or funky depending on your color and sequin choices). Make a bunch to hang on your tree or to give as gifts. And if you do I'd love to see them. Come share your projects on The Inspired Wren Share page. There you can link up images of your work from a blog, Flickr, Pinterest, or Instagram.
 |
| These bright baubles were made with stiffened felt sheets, plastic gems, and hot glue. Read more here! |
Pick your comfort zone - thread or glue - and go for it! Either way it's faster than it looks. In the end you'll have an elegant ornament (or bright, or funky depending on your color and sequin choices). Make a bunch to hang on your tree or to give as gifts. And if you do I'd love to see them. Come share your projects on The Inspired Wren Share page. There you can link up images of your work from a blog, Flickr, Pinterest, or Instagram.
Be sure to check out So Sew Easy for a great round-up of felt ornament tutorials -- from stuffed to flat, from complex to simple -- beginning with Deby's Felt Tree.
PS! Thanks for stopping by and reading to the end. If you're looking for other holiday-inspired projects consider the Holiday Crochet Planter Cover, the Tall-Tree Pillow, or the Table Running Trivet. And remember there are plenty of other project (and potential gift!) ideas on the Tutorials page. ~Ren.
Ren Murphy writes for The Inspired Wren.
___________________________________________________
You should really see all that goes into each project!
Summer means more playing than sewing, but you can still catch daily updates on Instagram (and Flickr) of works-in-progress. Get that behind the scenes view you’re looking for, and sneak peeks of First Tuesday Tutorials, too.
___________________________________________________
The Inspired Wren is a participant in the Amazon Services LLC Associates Program, an affiliate advertising program designed to provide a means for sites to earn advertising fees by advertising and linking to amazon.com.

