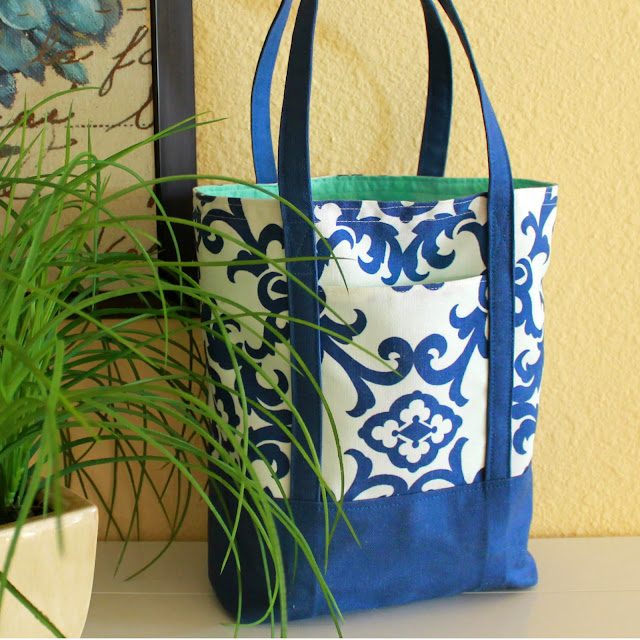
Create a fully-lined canvas tote with an outer pocket and reinforced bottom!
 |
In the midst of sewing along with Project Run & Play, I took a detour to sew up this tote as a gift for a friend. I chose it because it can have big impact and yet it really is a quick project to put together once you have the cutting dimensions figured out. It just so happened I still had my sketch from the Tote of Protection with the numbers already jotted down. As long as I was already sewing the bag again, I thought I’d share the dimensions (and the directions) here.
 |
If you’re like me and prefer to print out the tutorials you use, download the 3-page PDF version here for only $1.99! Otherwise, read on for step-by-step directions how to sew a fully lined, canvas Tote Bag with an outer pocket and a reinforced bottom, including full cutting dimensions so there's no guesswork!
MATERIALS
- Indoor/Outdoor Fabric for Outer Shell, ½ yard
- Duck-Cloth (Heavy Canvas) for Bottom Panel and Handles, ½ yard
- Coordinating Fabric for LiningThe indoor/outdoor fabric plus the duck-cloth can get thick, so a lighter-weight option like quilting cotton is a good choice here.
- Coordinating thread and heavy-duty needle
CUTTING
The dimensions listed here will create a final Tote Bag 8 ½″ wide x 11 ½″ tall x 4″ deep. You can easily change these dimensions to fit your need; keep in mind that the seam-allowance varies in places.
Indoor/Outdoor Fabric
Outer Shell: 14″ x 15 ½″; cut 2
Pocket: 5 ¾″ x 6 ½″; cut 1
Duck-Cloth
Bottom Panels: 14″ x 6 ¾″; cut 2 [Edited 5/21/14 to the correct measurements.]
Handles: 3″ x 46″; cut 2
Coordinating Fabric
Lining: 14″ x 15 ½″; cut 2
Pocket: 5 ¾″ x 6 ½″; cut 1
CONSTRUCTION
PREPARE HANDLES AND POCKET
1. Prepare each Handle by folding it in half, wrong sides together and press. Open it up and press each outside edge to the center line. Fold fabric in half again and press. The final width of the Handle will be ¾″ with the raw edges enclosed in the fold. Edge-stitch down each side. Set aside.
2. Prepare the Outer Pocket by placing Shell fabric and Lining fabric right sides together. Sew just the top seam with a ¼″ seam-allowance. Turn right sides out and press.
 |
| Steps 1 & 2: Prepare the Handles and the Front Pocket |
ATTACH POCKET AND HANDLES
3. Align the prepared Outer Pocket on the center of the Front Outer Shell with the top, sewn edge of the Pocket down 3 ¼″ from the top raw edge of the Outer Shell. Sew the sides of the pocket in place with a scant ¼″ seam-allowance. [Edited 6/8/14 to include missing directions.]
4. Place one prepared Handle on the Front Outer Shell, centered 5″ apart, aligning the raw ends with the raw bottom edge of the Shell. Be careful not to twist the Handle where it extends over the top of the Shell. The Handle will overlap the side edges of the Outer Pocket. Pin in place. Mark lines on the Handle 1 ½″ from the raw top edge of the Shell, and again 1 ¼″ down from the first lines. Sew the Handle to the Front Outer Shell one side at a time; stop stitching on your marked line, 1 ½″ from the top. Begin at the bottom edge, stitch over previous top-stitching on the Handle, and create X patterns as pictured using your marked lines as guides.
 |
| Steps 4 & 5: Attach the Handle and mark the stitch locations. |
5. Repeat Step 4 to attach the second Handle to the Back Outer Shell.
 |
| Steps 4 & 5: You should sew this from the front of the bag, but here's a view of the stitch pattern from the wrong side of the Back Outer Shell--easier to see than on the dark front. |
ATTACH BOTTOM PANELS
6. With right sides together and with one Bottom Panel oriented seemingly upside down (the bottom edge lying towards the top raw edge of one Outer Shell), align the top raw edge of the Bottom Panel 6 ¼″ from the bottom raw edge of the Outer Shell. Sew along top edge of the Bottom Panel with a ¼″ seam allowance. On the Front Shell this will overlap the Pocket, closing the bottom edge. Flip the Bottom Panel into place. Press. Top-stitch along edge. [Edited 6/8/14 to the correct measurements.]
7. Repeat Step 6 with the second Bottom Panel and Outer Shell.
CONSTRUCT OUTER SHELL & LINING
8. With right sides together, place the Front Outer Shell and the Back Outer Shell together being sure to align the Handles and the tops of the Bottom Panels. Sew along the side seams and the bottom seam using a 1/2″ seam allowance. Reinforce the bottom seam by sewing it a second time. Press seams open.
9. Pinch one bottom corner together so that the side seam and the bottom seam touch. Mark up 2″ from the corner point and draw a 4″-wide line perpendicular to the seams. Stitch on the line. Stitch again to reinforce the seam. Trim the seam allowance to 1/2″. Repeat on the second bottom corner. Set aside.
10. Repeat Steps 8 & 9 with the Lining Fabric.
JOIN OUTER SHELL & LINING
11. Pin the Handles down onto the Outer Shell so they are out of the way. With the Outer Shell right side out, and the Lining right side in, place the Outer Shell into the Lining so that right sides are together and the top, raw edges align. Pin in place matching the side seams and avoiding the Handles. Sew together with a 1″ seam-allowance, but leave a 4–5″ opening for turning.
12. Reach into the opening and turn the bag right side out. Position the Lining in place and press.
13. Edge-stitch the top-seam, closing the opening for turning as you do so. Then top-stitch a generous ¼″ down from the edge-stitching.
YOU'RE DONE!
Because the Handles wrap to the bottom this is a tough tote that can withstand a lot of weight. It also maintains its structure nicely (and can take a lot of abuse) thanks to the indoor/outdoor fabric and duck-cloth. There are so many fabulous fabric options in the décor fabrics department. And remember it doesn’t require a lot of fabric, so don’t forget to also check the remnant bin at your local fabric store.
This is a quick sew, but if you want to go even faster skip the Pocket and the Lining. I would suggest adding an inch to the top and creating a 1″ rolled hem (fold over 1″, fold over 1″ again, then top-stitch); be sure to adjust all measurements made from the top raw edge of the Outer Shell by adding 1″ as you measure down. I would also suggest using bias tape, or your preferred method, to finish the seams. My preschool-age daughter carries (or should I say, drags) an unlined version of this tote to school daily and it’s holding up well.
If you use this tutorial, I’d love to see and hear about your results. Be sure to use #TIWlinedcanvastote and #theinspiredwren, and tag me @theinspiredwren on social media!
 |
| The fabric combinations are endless. |
PS -- Thanks for reading to the end. If you're looking for other bags to tote around, try the all-cotton, self-lined 3-10 Tote, the quick-sew Shortcut Quilted Tote, or any of these great bag tutorials! ~Ren

Ren Murphy writes for The Inspired Wren.
___________________________________________________
You should really see all that goes into each project!
From my model preferring to wear washi tape on her belly button instead of the clothes I've sewn for her, to the ingenious way that I’ve re-purposed my favorite sewing tool, a chopstick, into a spool pin for double needle sewing on my machine. Daily updates on Instagram (and Flickr) of works-in-progress will give you that behind the scenes view you’re looking for, and sneak peeks of First Tuesday Tutorials, too.


